In an earlier time we programmed our computer to detect a green color object. Now, lets see how to program the Beaglebone Black to detect the Green color objects and respond accordingly.
I am going to show you this by connecting the Beaglebone Black from Ubuntu 20.04 Focal Fossa. Beaglebone Black is booted with image “bone-debian-9.5-lxqt-armhf-2018-10-07-4gb.img” and updated lately.
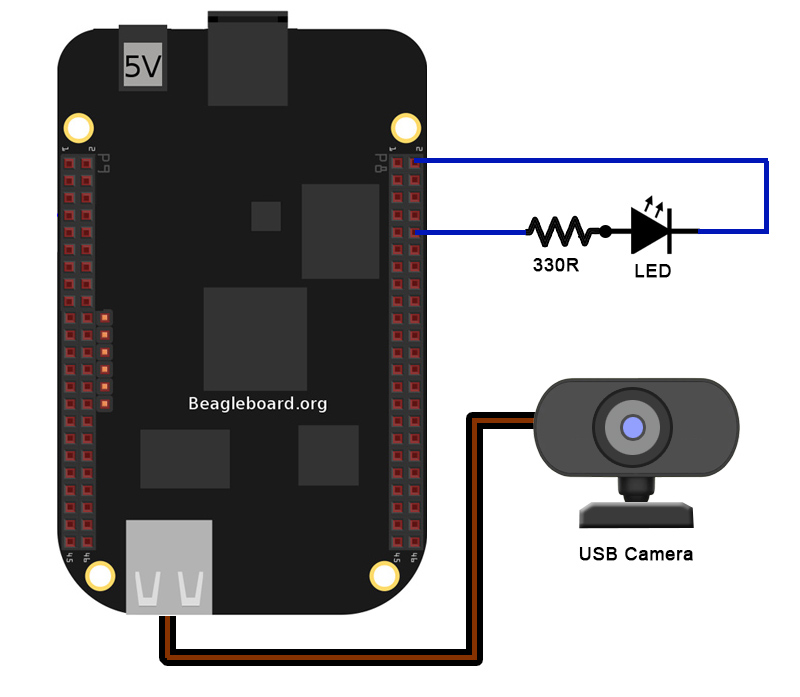
The wiring diagram is given below.

First connect your Beaglebone Black to the PC via USB cable and log into it via terminal. (Hope you already know)
After logging in open a new nano text editor (sudo nano green_obj_detect.py).
import necessary libraries. With the above image (Updated lately), you do not need to install them.
import cv2
import numpy as np
import Adafruit_BBIO.GPIO as GPIO
import time
Then we use the USB web camera.
cap = cv2.VideoCapture(0)As well, we define the output ports of the BBB. Here we use the pin P8_10.
GPIO.setup("P8_10", GPIO.OUT)Also I define a counter variable for this program, because I only want to run this for about 25 seconds (You can change this as desire.)
count = 0Now we start looping.
while(count < 100):We read frame by frame and convert the color scheme of the frame BGR to HSV
_, frame = cap.read()
hsv = cv2.cvtColor(frame, cv2.COLOR_BGR2HSV)
Next we defined the color we desire. For each color we should define a upper and lower limit of color that we required as a numpy array. Following is what I have chosen to define the range of green color in HSV.
lower_green = np.array([65,60,60])
upper_green = np.array([80,255,255])
Our frame, the HSV image, is thresholded among upper and lower pixel ranges to filter the green color
mask = cv2.inRange(hsv, lower_green, upper_green)Then we use a kernel to watch through the image, or the frame, and dilated to smooth the image. Please refer the OpenCV docs for further information. click here.
kernel = np.ones((5,5),'int')
dilated = cv2.dilate(mask,kernel)
With the mask we created above, we extract the green color area from original image. You can google the web for more information about Bit-wise Operations.
res = cv2.bitwise_and(frame,frame, mask=mask)Then we threshold the masked image and get the contours.
ret,thrshed = cv2.threshold(cv2.cvtColor(res,cv2.COLOR_BGR2GRAY),3,255,cv2.THRESH_BINARY)
image, contours, hier = cv2.findContours(thrshed,cv2.RETR_LIST,cv2.CHAIN_APPROX_SIMPLE)
We start a “for” loop to search through all the contours and get the area of each.
for cnt in contours:
    area = cv2.contourArea(cnt)
It is not necessary to watch for all the contour areas because much smaller ones are annoying. Hence, we define a minimum limit for the area. Here I will take any area over 1000. If an area over 1000 is detected then we turn on the LED or else we keep the LED turned off.
if area >1000:
    GPIO.output("P8_10", GPIO.HIGH)
else:
    GPIO.output("P8_10", GPIO.LOW)
The count variable will increase by 1. As well, we wait for some time before reading the next frame.
count = count + 1
time.sleep(0.25)
It is better to release the video capture and cleaning up the GPIO
cap.release()
GPIO.cleanup()
Save the file. Run —> Run Module Or hit F5. Download the python script Here.